Ultrasonic cleaners are powerful tools for precision cleaning, but like any equipment, their performance can degrade over time. Whether you’re cleaning lab instruments, medical tools, or industrial components, ensuring your ultrasonic cleaner operates at peak efficiency is essential for consistent results. In this blog, we’ll explore practical tips on how to check and maintain the performance of your ultrasonic cleaner—so you can catch issues early, extend its lifespan, and maintain high cleaning standards in your facility.
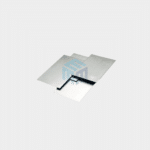
Foil Test:
-
- Method: Submerge a piece of aluminum foil into the tank with the cleaning solution and run the ultrasonic cleaner for a few minutes.
- Observation: The foil should develop an even pattern of tiny holes or indentations. Uneven patterns or large areas without holes may indicate issues with the transducers or the distribution of ultrasonic energy.
Glass Slide Test:
-
- Method: Apply a thin layer of pencil lead or a similar substance on a glass slide and submerge it in the tank.
- Observation: After running the cleaner, the lead should be evenly removed. Incomplete or uneven removal may indicate performance issues.
Cavitation Meter:
-
- Method: Use a cavitation meter designed to measure ultrasonic activity within the tank.
- Observation: The meter will provide a quantitative reading of the ultrasonic energy, allowing you to compare it against the manufacturer’s specifications.
Degassing Check:
-
- Method: Observe the degassing process when you first fill the tank with a new cleaning solution.
- Observation: You should see bubbles rising to the surface, indicating that the cleaner is effectively removing dissolved gases. If there are few or no bubbles, cavitation might be insufficient.
Temperature Consistency:
-
- Method: If your cleaner has a heating function, check the temperature consistency with a thermometer.
- Observation: Ensure the temperature matches the set value and remains stable throughout the cleaning cycle.
Bubble Observation:
-
- Method: Simply observe the tank while the cleaner is running.
- Observation: You should see a consistent stream of small bubbles throughout the tank. Large bubbles or uneven distribution might indicate a problem.
Cleaning Efficacy Test:
-
- Method: Test the cleaner with known contaminated items (e.g., greasy or dirty tools).
- Observation: After cleaning, the items should be free of contaminants. If they are not thoroughly cleaned, the ultrasonic cleaner might not be performing optimally.
Transducer Function Test:
-
- Method: Use an ultrasonic transducer tester if available.
- Observation: This will provide detailed information about the performance and condition of each transducer, helping identify any faulty ones.
Sound Test:
-
- Method: Listen to the sound of the ultrasonic cleaner while it is operating.
- Observation: A consistent buzzing or humming sound is normal. Any unusual noises, such as clicking or rattling, could indicate mechanical issues.
Regular Maintenance:
-
- Method: Perform routine maintenance as per the manufacturer’s guidelines.
- Observation: Ensure that all components are in good condition, and replace any parts showing wear and tear.
By regularly performing these tests and observations, you can ensure your ultrasonic cleaner is operating at its best, providing effective and efficient cleaning for your items.
Conclusion:
Regularly checking the performance of your ultrasonic cleaner ensures optimal cleaning results, extends equipment life, and reduces the risk of costly downtime. By monitoring indicators such as cavitation activity, cleaning cycle efficiency, and solution quality, you can maintain consistent performance and detect issues before they escalate. A well-maintained ultrasonic cleaner not only protects your investment but also supports the high standards required in laboratory, medical, and industrial environments.